Git Hub API
The Git Hub API can be used with Git Hub Actions to automate the publication of assignments.
You are able to create your assignments in Codio, connect the box to your GH repo and when merging your branch to master will be able to automatically publish the Codio assignment.
Set up GitHub API Integration
Create your API integration in the Organization->Integrations area. This is only available to users with Admin rights.

The name of the integration is added to the version history record. There is no limit to the number you can create so you can use the ID’s in your individual GH repo or use in your GH account to apply to all repos
API Integration information
Click on the created integration to view the Client and Secret ID’s where you can copy to clipboard to add into your GH account
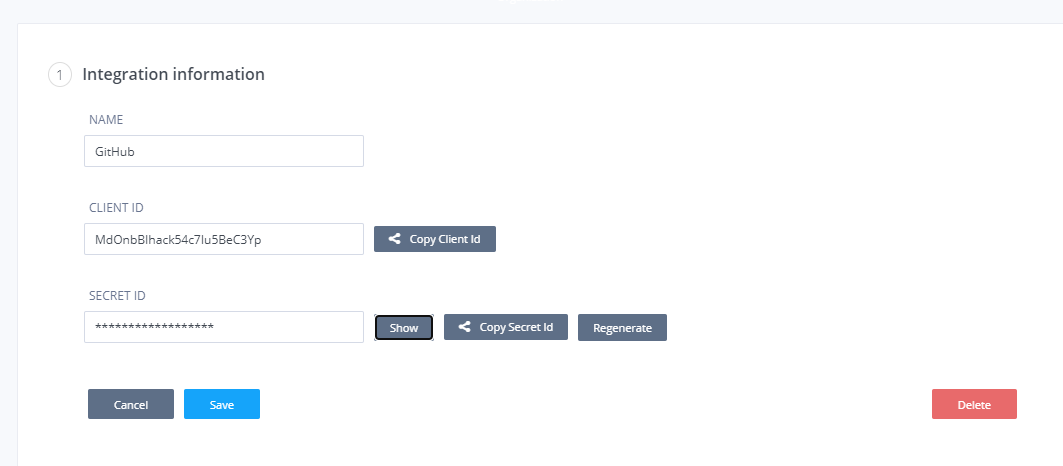
The secret ID can be regenerated if required to manage/control access to publishing the codio assignment.
Adding ID’s to GitHub account
In your repo go to Settings -> Secrets and create Client ID and Secret ID copying in from your Codio integration.
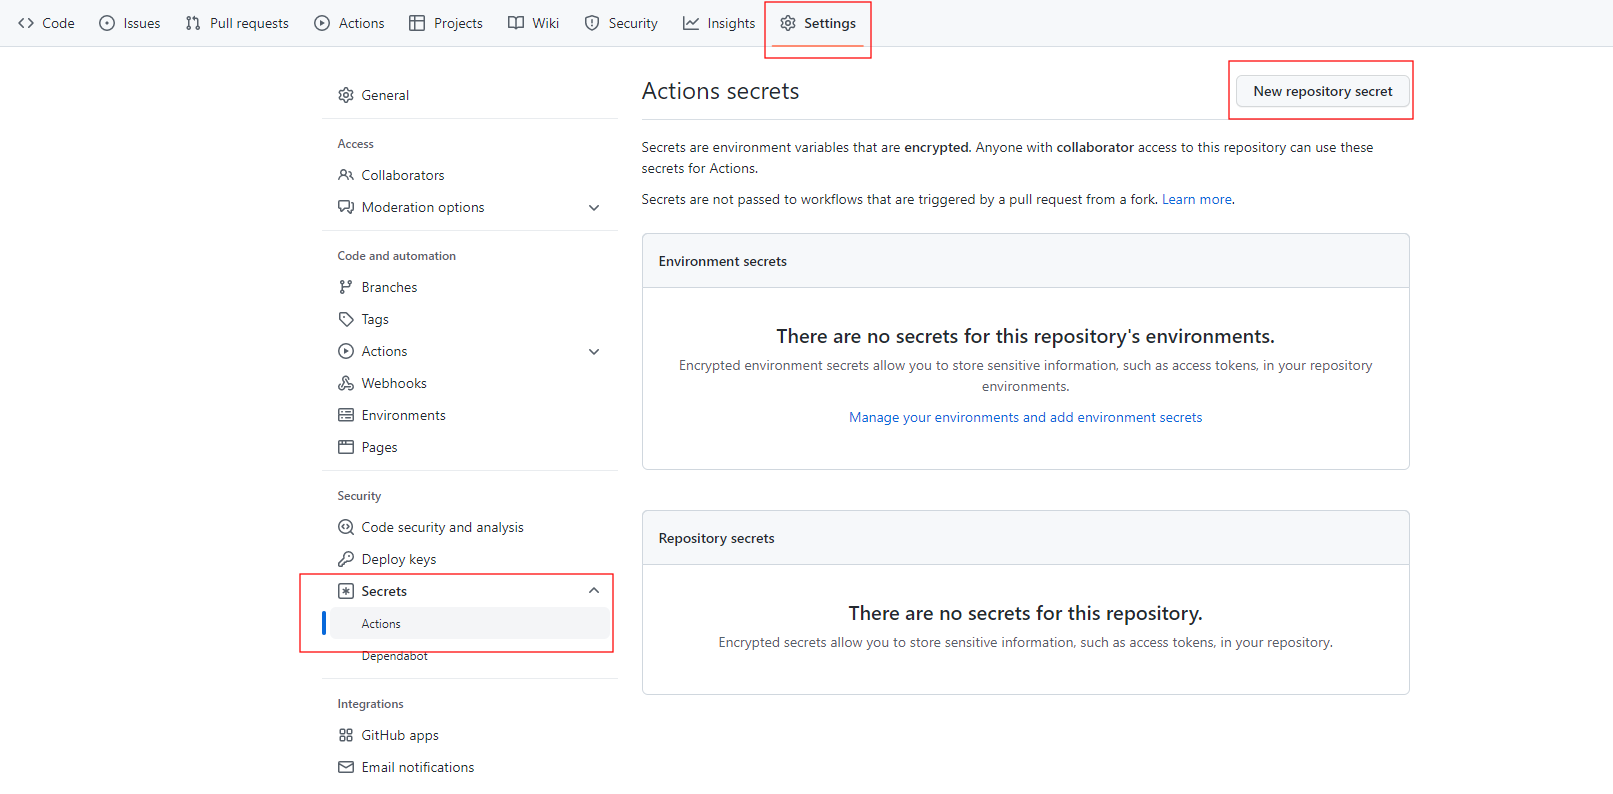
To create secrets for your organization’s repo (these will apply to all repos in the account and be available for all collaborators), see encrypted secrets for an organization. To create these for an individual repo,, click on New repository secret and create your secret keys.
We recommend you that you use the words Client or Secret when you name each key to identify which one it is and also use the name to indicate if the key is for an individual repository or for all repos in an organization.
Implementing workflow actions
From your repository on GitHub or within your project, create a new file in the .github/workflows directory with the extension .yml and configure
for use.
See Quickstart for GitHub actions
Example .yml file for publishing a project to an assignment
name: codio-publish
# Run this workflow every time a new commit pushed to your repository branch noted below
on:
  push:
    branches:
      - master

jobs:

  build:
  # Set the type of machine to run on - do not change this. Any warnings you may see in workflow actions can be ignored
    runs-on: ubuntu-latest
    steps:
    # Checks out a copy of your repository on the ubuntu-latest machine
      - name: Checkout
        uses: actions/checkout@v4

      - name: Cleanup
     # removes the following files/folders when publishing
        run: rm -rf README.md

      - name: Publish to Codio
        uses: codio/codio-assignment-publish-action@master
        with:
          # Use the ID's from the secrets below
          client-id: ${{ secrets.CODIO_PRODUCTION_CLIENT_ID }}
          secret-id: ${{ secrets.CODIO_PRODUCTION_SECRET_ID }}
          dir: ./
          course-id: d5acfd16bb506756595cef3399e1d4
          assignment-id: 3b52656756565656cd19a4b869b8
          # You can also use course-name or assignment-name to reference the course/assignment if you prefer
          # course-name: your course name
          # assignment-name: your assignment name
          changelog: ${{ github.event.head_commit.message }}
          # Set the domain you are working on - codio.com or codio.co.uk
          domain: codio.com
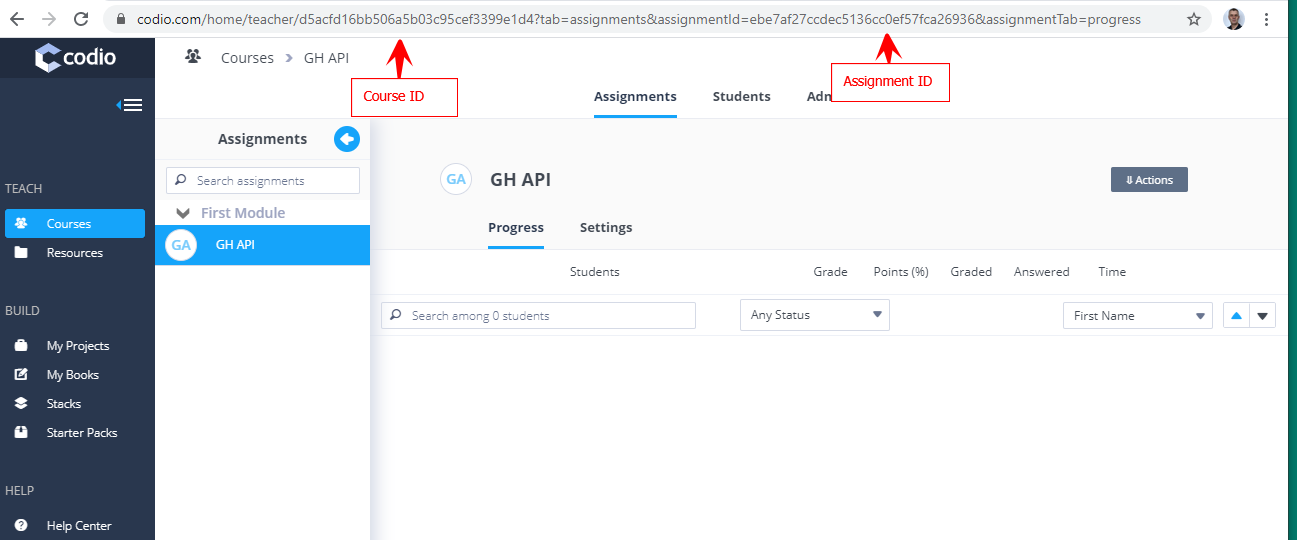
Get the Course and Assignment ID
The course/assignment id’s are found from the URL in your browser when opening the assignment when on the Overview tab. The assignments need to be published to get this information whether using the course/assignment id’s or the course/assignment names.
Publishing projects into multiple assignments
If you have a large project, you can use the same methodology to publish the project into multiple assignments in as many different modules as you required.
Mapping your project structure into the individual assignments
From your repository on GitHub or within your project, create a new folder in the .github/workflows directory and within that create individual .yml files for each of the assignments you wish to publish the project into, defining the ‘assignment’, ‘section’ and ‘paths’. It is these files that define what Chapters/Sections/Files from the main project are published into individual assignments
Example .yml file mapping section from project into individual assignments:
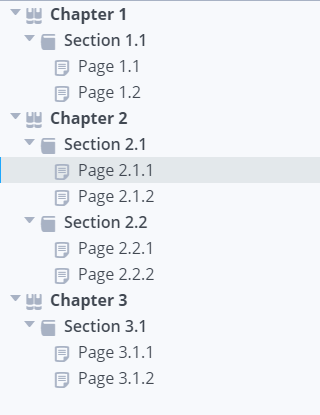
Based on the above image, to split the project into 3 separate assignments requires 3 .yml files in the mapping folder set above
To publish Chapter 1, Section 1.1 into an assignment:
# the id of assignment 1
- assignment: 617c4f1cf9dcb8764hjk97100a980a09
# or use the assignment name of assignment 1
# - assignmentName: your assignment name
# the section from guides, where both the Chapter and Section names are set in Guides
  section:  ["Chapter 1", "Section 1.1"]
# to include all files contained in the folder Section 1.1
  paths: ['Section 1.1/**']
To publish Chapter 2, Section 2.1 and Chapter 2, Section 2.2 into an assignment:
# the id of assignment 2
- assignment: 36f5f6d99f69a7dc65f5ce8d619e8494
# or use the assignment name of assignment 2
# - assignmentName: your assignment name
 section:  ["Chapter 2", "Section 2.1"]
  paths: ['Section 2.1/**']

# to include another section from guides in the assignment
- assignment: 36f5f6d99f69a7dc65f5ce8d619e8494
# or use the assignment name of assignment 2
# - assignmentName: your assignment name
  section:  ["Chapter 2", "Section 2.2"]

  paths: ['Section 2.2/**']
To publish Chapter 3, Section 3.1 into an assignment:
- assignment: 399098453265fb2c3eca360db6f5e462f
# or use the assignment name of assignment 3
# - assignmentName: your assignment name 3
  section:  ["Chapter 3", "Section 3.1"]
  # will show all files set to be visible whether within a folder shown for the student or in the workspace
  paths: ['**']
Example .yml workflow actions file for publishing into multiple assignments:
name: codio-publish
# Run this workflow every time a new commit pushed to your repository branch noted below
on:
  push:
    branches:
      - master

jobs:

  build:
  # Set the type of machine to run on - do not change this. Any warnings you may see in workflow actions can be ignored
    runs-on: ubuntu-latest
    steps:
    # Checks out a copy of your repository on the ubuntu-latest machine
      - name: Checkout
        uses: actions/checkout@v4

      - name: Cleanup
     # removes the following files/folders when publishing
        run: rm -rf README.md

      - name: Publish to Codio
        uses: codio/codio-assignment-publish-action@master
        with:
        # Use the ID's from the secrets below
          client-id: ${{ secrets.CODIO_PRODUCTION_CLIENT_ID }}
          secret-id: ${{ secrets.CODIO_PRODUCTION_SECRET_ID }}
          dir: ./
          course-id: d5acfd16bb506756595cef3399e1
        # You can also use course-name or assignment-name to reference the course
          # course-name: your course name
          changelog: ${{ github.event.head_commit.message }}
          # the location of your yaml mapping files
          yml: ./.github/yaml_map
          # Set the domain you are working on - codio.com or codio.co.uk
          domain: codio.com
Note
The ‘assignment-id’ or ‘assignmentName’ field is not required when publishing to multiple assignments. The mapping of the content from the project to the individual assignments is managed by the files in the ‘yml’ location
Working with GH API
The basic premise is that when updating your Codio assignment, you connect to your GH repo and create a new branch. Make your required changes and push to your repo. When you then merge your branch to the master branch, the GH workflow runs and publishes your Codio assignment. Progress/errors can be reviewed from the Actions area in your repo It is recommended when you merge, that you select the option Squash and Merge as you can combine all your merge request’s commits into one and retain a clean history.
Working with GH API in staging
Your .yml file is commonly set up to execute against merges into the master branch but can be changed to execute when other branches merged and the codio assignment to be updated can be managed by reviewing/changing the course/assignment ids