Multiple Choice
Multiple choice assessments allow you to present a question with single or multiple response options. These questions can be created manually or generated using AI.
Assessment Auto-Generation
Assessments can be auto-generated using the text on the current guide page as context. For more information, see the AI assessment generation page.
Assessment Manual Creation
Follow these steps to set up multiple choice assessments manually. For more information on Metadata (optional) and Files (optional), see Assessments.
On the General page, enter the following information:
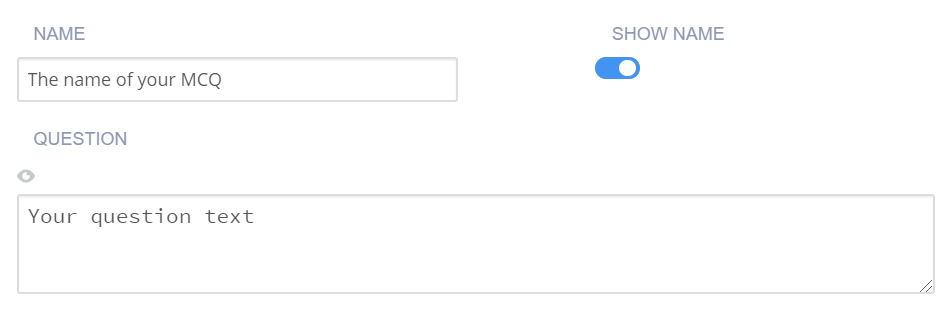
Name - Enter a short name that describes the test. This name appears in the teacher dashboard for easy reference. To hide the name from the student’s view of the challenge, toggle Show Name to disable it.
Question - Enter the question instruction that is shown to the student.
Click Execution in the navigation pane and complete the following information:
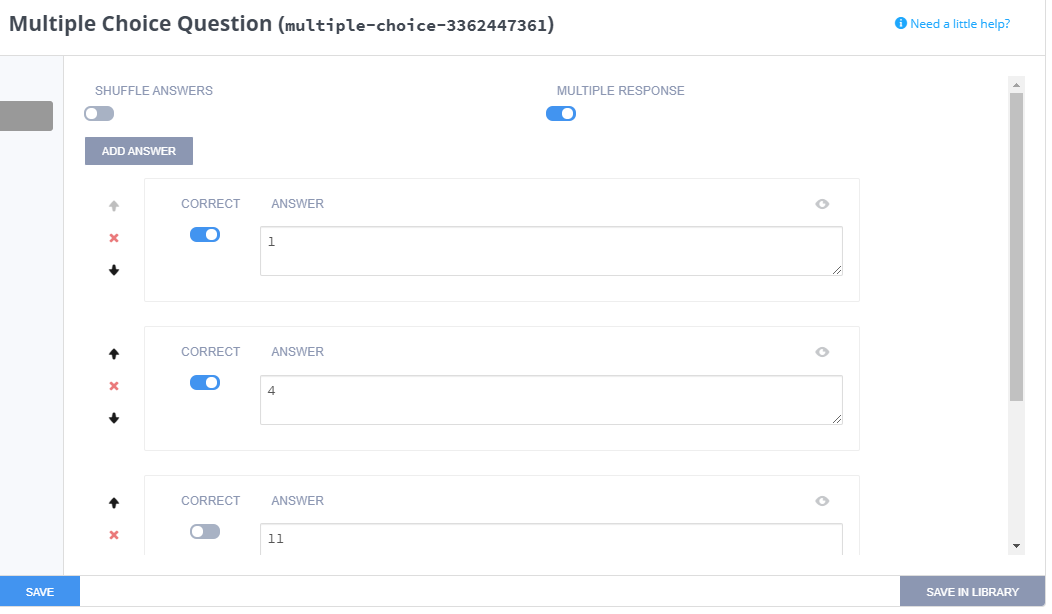
Shuffle Answers - Toggle to randomize the order of the answers so each student sees the answers in a different order.
Multiple Response - Toggle to enable a user to select more than one answer.
Answers - Mark the correct answer(s) to the question. You can add as many options as needed. For each answer, toggle to enable as correct answer (for multiple responses), or click the radio button for the correct single response.
Ordering - Use the Up and Down arrows to change the order in which the answers are presented.
Click Grading in the navigation pane and complete the following fields:
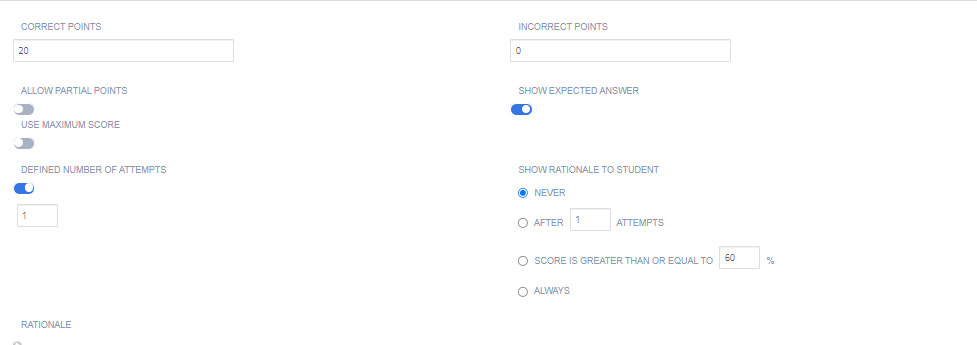
Correct Points - Enter the score if the student selects the correct answer. You can choose any positive numeric value. If this is an ungraded assessment, enter zero (0).
Incorrect Points - The score to be deducted if the student makes an incorrect selection. Typically, this value will be 0, but you can assign any positive numeric value if you wish to penalize guessing. If this assessment is to be ungraded, enter zero (0).
Allow Partial Points - Toggle to enable a percentage of total points to be given based on the percentage of answers they correctly answer.
Use Maximum Score - Toggle to enable assessment final score to be the highest score attained of all runs.
Show Expected Answer - Choose when students can view the expected output: never, when grades are released, or always.
Define Number of Attempts - Toggle to enable attempt limits and specify the maximum number of attempts. If disabled, students can make unlimited attempts.
Show Rationale to Students - Toggle to display the rationale for the answer. This guidance information will be shown to students after they have submitted their answer and any time they view the assignment after marking it as completed. You can set when to show this by selecting from Never, After x attempts, If score is greater than or equal to a % of the total, When grades are released, or Always.
Rationale - Enter guidance for the assessment. This is always visible to the teacher when the project is opened in the course or when opening the student’s project.
Click Create to complete the process.