Adding media
Audio, Images and Videos can be added to a Guide page.
Audio
Audio files can be added to and played from your project.
To add Audio: select Media icon in the guides editor ribbon where you can define the source audio file along with any actions the should be triggered at specific times during playback.
Source Name - select the source file either from .guides/media folder if already uploaded to the project or upload directly from your PC and it will be stored in the .guides/media folder.
Add Action - specifies actions that are triggered at specific times during playback. The following options are available.
Open file Close file Open Terminal Close Terminal Run command Highlight Close all tabs Pause
Recording Audio inside Guide
You can record audio using a guide button and save that audio in a file. To add record button, select Record Audio icon in the guides editor ribbon.
Once the button code appears on the guide page, you can change the button text and the file location as per your requirement. If you want to hide the generated audio file from students then save the file in .guides folder.
To record the audio, permission for your microphone is required and your browser will prompt you to allow permission. If permission has been denied, you can re enable in your browser, if you do not know how then see Permissions.
Images
Inserting an image is similar. You can use the Image icon in the guides editor ribbon or write in markdown within your content area. Here are some examples. PNG and JPG image types are supported. Note that the 2nd and 3rd examples point to images within your project.
Store your images in the .guides/img folder if you do not want them to be readily accessible to students.


You can drag/drop images from your project file tree into your content. They will automatically contain the correct path.
For Markdown pages:

For HTML pages:

Videos
You can use the Image icon in the guides editor ribbon defining the URL to the video or you can manually add to your content.
Include embedded videos using the standard <iframe> html tag.
YouTube
If you wish to embed a YouTube video, go to the Share option and select Embed to obtain the code snippet.
`
<iframe width="560" height="315" src="//www.youtube.com/embed/1JNhoVbmNAo" frameborder="0" allowfullscreen></iframe>
`
Vimeo
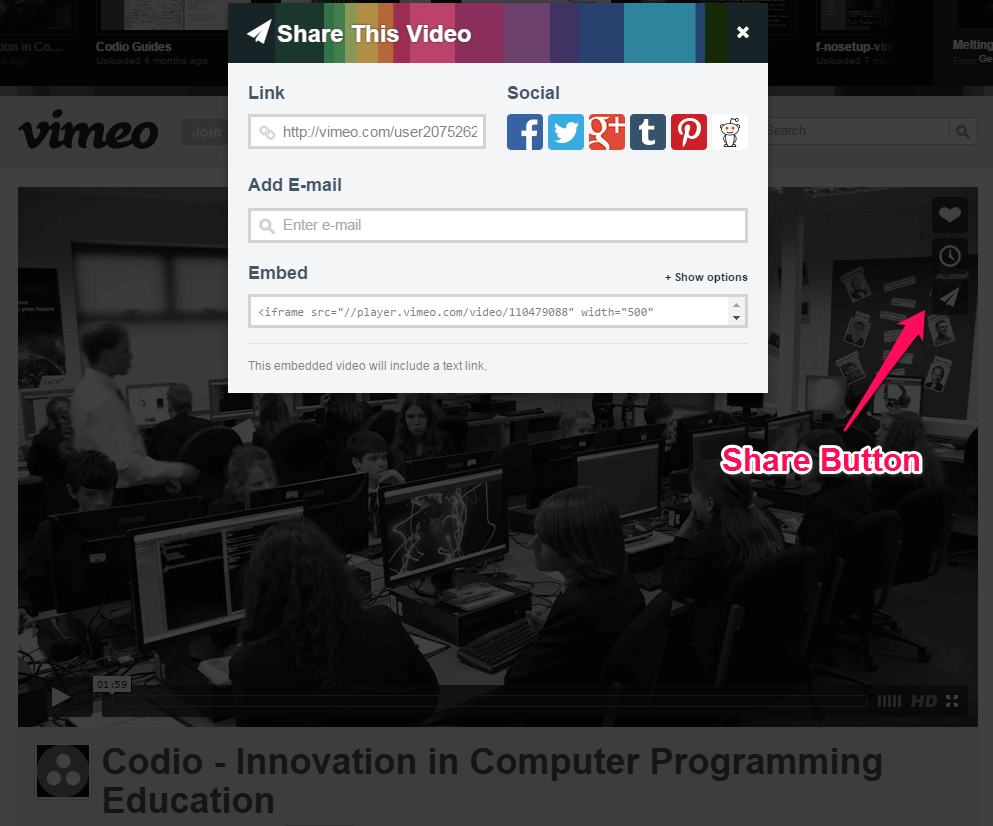
If you wish to embed a Vimeo video, go to the Share option and select Embed to obtain the code snippet.

`
<iframe src="//player.vimeo.com/video/110479088" width="500" height="281" frameborder="0" webkitallowfullscreen mozallowfullscreen allowfullscreen></iframe> <p><a href="http://vimeo.com/110479088">Codio - Innovation in Computer Programming Education</a> from <a href="http://vimeo.com/user20752628">Codio</a> on <a href="https://vimeo.com">Vimeo</a>.</p>
`
Hyperlinks
Creating a hyperlink on a piece of text is easy.
Go to [Google](google.com) to look stuff up.
iframes
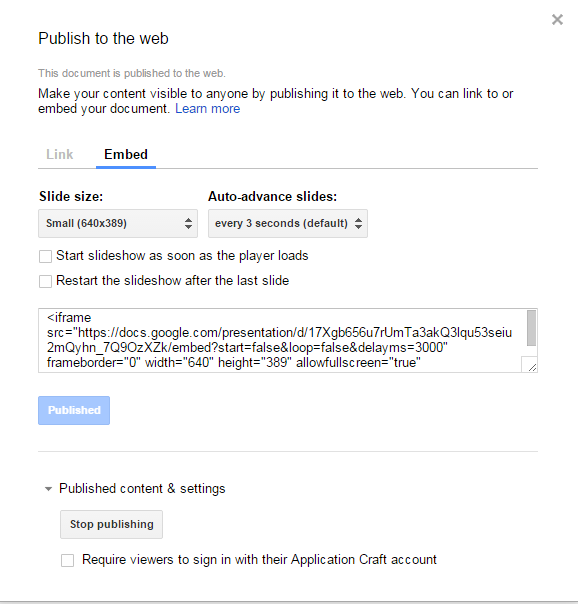
You can embed content in an iframe using the <iframe> html tag.
To embed from Google Docs, go to File>Publish to Web and select Embed to get the code snippet


