Content Editing
Content can be written in Markdown, a lightweight markup language for adding formatting to plaintext documents. See below for more details.
Selecting Sections in Edit Mode
To select a section while editing:
Use the navigation buttons in the header area
Choose a section from the index list
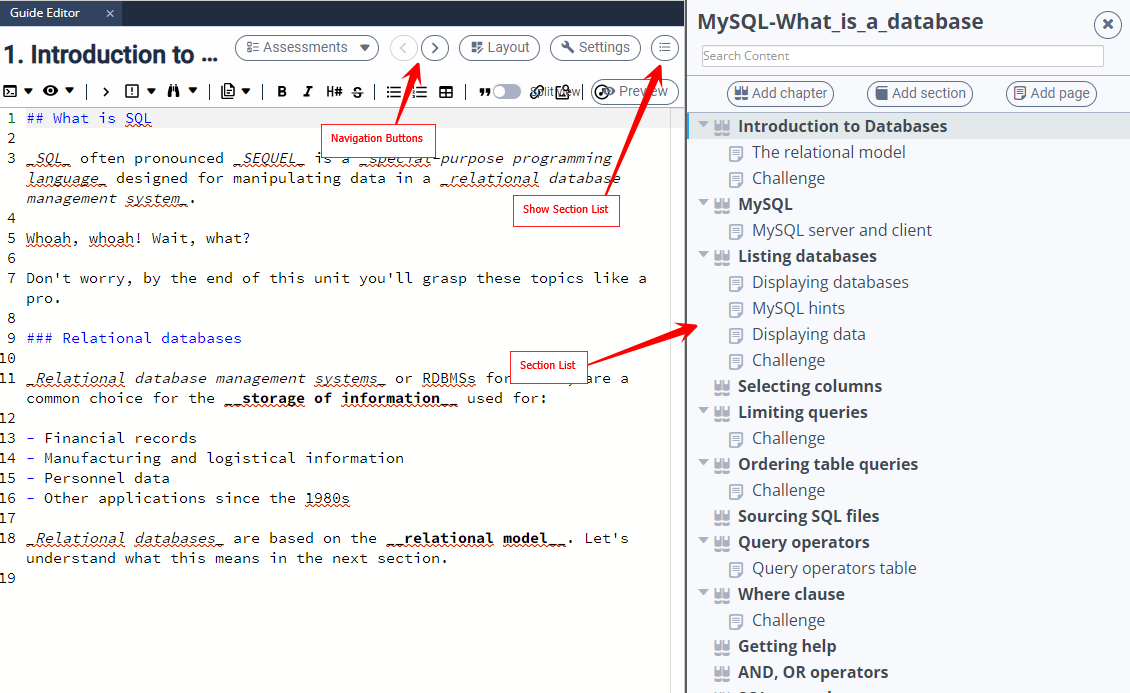
Renaming the Section
To rename your section, click on the section title in the header area.
Writing Content
Write content in the main content area.
Editing Hotkeys
Set hotkeys for commonly used editing functions:
Bold selected text
Enumerate selected text
Order selected text
Make selected text as a code block
Command button
For more information, see the [guides] area in User Preferences.
Custom CSS
Your content in Play Mode or preview matches the student view exactly.
To customize the default CSS styling, navigate to Tools → Guide → Add Custom CSS.
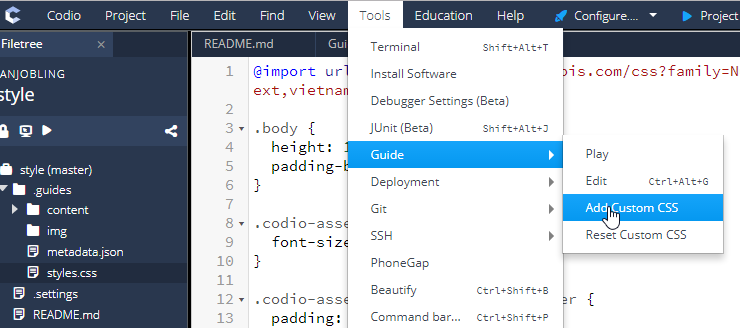
To restore the default CSS styling, select Reset Custom CSS.
For instructions on inserting images, videos and hyperlinks, see the media guide.
Editing Focus Styles
To change the focus background of a guide:
.rendered-markdown:focus {
  background: #ccc;
}
To set a custom focus outline:
.rendered-markdown:focus {
  outline: 2px solid red !important;
}
Note
You can also edit the focus style directly in the custom CSS file.

Setting Course Level Custom CSS
You can now apply custom CSS at the course level, eliminating the need to apply CSS to each assignment individually. This can be configured by adding CSS URLs in the Course Details section.
To configure this, follow these steps:
Click on Courses from the top navigation menu.
Select the course you want to edit.
Click Course Details.
Add the URLs in the following fields:
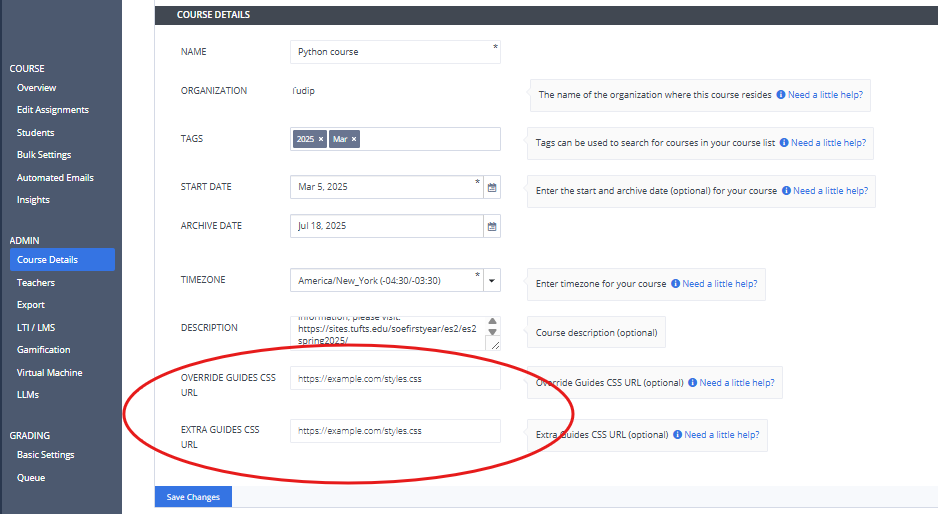
CSS Option |
Description |
|---|---|
Override Guides CSS URL |
This URL completely replaces Codio’s default CSS. If a URL is provided, Codio’s default CSS will be ignored, and the CSS from the specified URL will be used. |
Extra Guides CSS URL |
This URL adds additional CSS on top of Codio’s default styles. It enhances or customizes the existing Codio CSS without removing it. |
Click Save to apply the changes.
Markdown
An editor ribbon is available to help you create markdown content, including Codio-specific buttons for opening and closing content within Guides.

For those who prefer to write markdown manually, here’s a summary of formatting codes:
Basic Formatting
Headers/Titles
To display a header or title, you can use the # character at the start of the line. The more # characters you add, the smaller the font.
# Big title
## Smaller title
### Even smaller title
#### etc.
Bold and Italic
To create bold or italic text, you use ** and * either side of the text.
I want to say that **this is really important**, you know
I *really* like chocolate
Lists
Code Blocks
Code blocks display syntax-highlighted code in a formatted box. To create one, wrap your code between two lines of three backticks. Here is an example using Javascript.
This JavaScript code:
var i;
for(i = 0; i < 10; i++) {
   document.write(i);
}
is created using:
```js
// your code...
```
The opening backticks should include a language identifier (e.g., js, python) for proper syntax highlighting. Many languages are supported. See a full list of supported languages here.
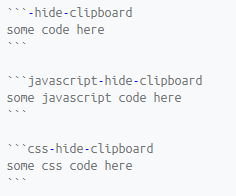
Copy to Clipboard Feature
Code blocks automatically include a ‘copy to clipboard’ button, allowing students to easily copy code for use in assignments.
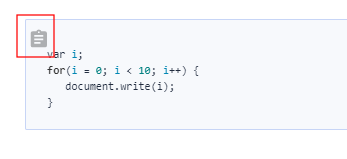
If you wish to suppress the ‘copy to clipboard’ button in the code block, append `-hide-clipboard` to the first line.
Example
Code Segments
If you want to insert a piece of code inline with the rest of your text, then you use a single ` (backtick) character either side of the text. For example,
We can define a variable var x; if we like
… is written in markdown as
We can define a variable `var x;` if we like
Note
For multi-line code or longer snippets, use code blocks instead (see Code Blocks section).
Math Blocks
Display mathematical formulas and equations using LaTeX syntax in math blocks. To add mathematical expressions, you can use the math block as follows:
```math
F = G \frac{m_1 m_2}{r^2}
```
The example above will render:
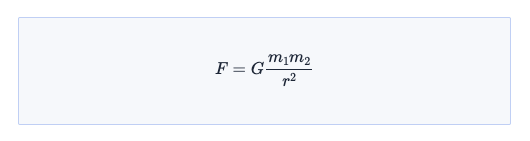
Important
Math blocks do not include a clipboard icon for copying content.
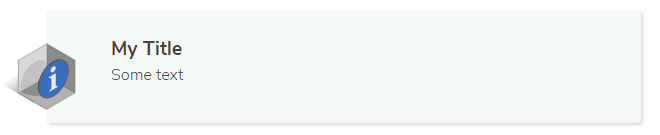
Callout Blocks
If you want to show a callout block, a number of options are available.
Available callout types:
important, info, warning, topic, definition, challenge, guidance, meetup, hackathon, create, calendar, growthhack, xdiscipline, debugging
For example:
|||info
# My Title

Some text

|||
Note
The Guidance callout block is only visible in play mode to designated teachers within a course. It is not visible for students.
Hyperlinks, Images, Videos & iframes
For detailed instructions on adding hyperlinks, images, videos, and iframes, see Adding Media.
HTML
Include HTML tags directly in your content for additional formatting and functionality.
Latex / MathJax
Latex is supported using MathJax.
Inline Math
Use single $ symbols to wrap inline equations:
When $a \ne 0$ there are two solutions to $(ax^2 + bx + c = 0)$
The example above will render:

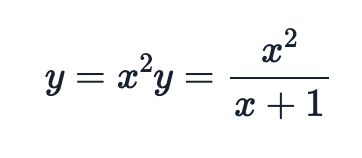
Multi-line Math
Use double $$ symbols for multi-line equations:
$$
y=x^2
y=\frac{x^2}{x+1}
$$
The example above will render:
Collapsible Content
Collapsible content is useful for providing information that students can reveal when ready. Use the <details> <summary> HTML elements, which may require mixing HTML and Markdown syntax.
Note
If you have code blocks you must have an empty line after the closing
</summary>tag.All code block starter lines, e.g. ```js must be preceded by a blank line.
The closing block ``` tag must be followed by a newline.
If you have multiple collapsible sections you must have an empty line after the closing
</details>tag.If you want the content to show by default, use <details open>.
Example
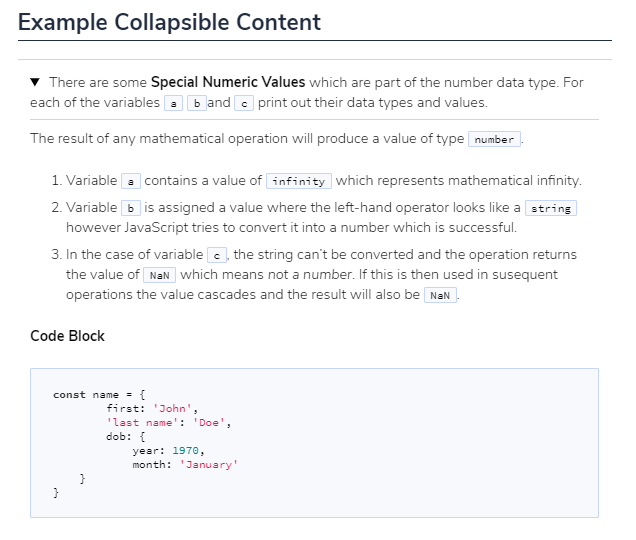
The following is the code used to create the image above. Three code blocks are required for this display.
## Example Collapsible Content

<details><summary>
    There are some <b>Special Numeric Values</b> which are part of the number data type. For each of the variables <code>a</code> <code>b</code>and <code>c</code> print out their data types and values.
</summary><hr>

The result of any mathematical operation will produce a value of type `number`.

1. Variable `a` contains a value of `infinity` which represents mathematical infinity.
2. Variable `b` is assigned a value where the left-hand operator looks like a `string` however JavaScript tries to convert it into a number which is successful.
3. In the case of variable `c`, the string can't be converted and the operation returns the value of `NaN` which means _not a number_. If this is then used in subsequent operations the value cascades and the result will also be `NaN`.

<h6>Code Block</h6>

```js-hide-clipboard
const name = {
        first: 'John',
        'last name': 'Doe',
        dob: {
            year: 1970,
            month: 'January'
    }
}
```

</details>